創建 Java Card 應用程序的典型步驟如下:
編寫 Java 源代碼.
編譯 源代碼.
將類文件 轉換 為 Converted Applet(CAP)文件.
驗證 CAP 是否有效;此步驟為可選.
安裝 CAP 文件.
使用 Java 程序設計語言開發傳統程序時,前兩個步驟是相同的:編寫 .java 文件並將它們編譯為 .class 文件.雖然您已經創建了 Java Card 類文件,但是該過程仍可改變.
將 Java Card 類載入 Java Card 設備之前,必須將它們轉換為標準的 CAP 文件格式,然後選擇性地進行驗證:
完成驗證之後,便可以將 CAP 安裝到 Java Card 設備中了.
Sun Java Card 開發工具箱
您可以使用 Sun Java Card 開發工具箱編寫 Java Card applet,甚至在沒有智能卡或卡片讀取器的情況下對它們進行測試.該工具箱包含了需要開發和測試 Java Card applet 的所有基本工具:
Java Card 工作站開發環境(JCWDE)是一個方便且易於使用的 Java Card 模擬工具,使開發人員無需轉換和安裝 CAP 文件而直接執行類文件.JCWDE 可以使用調試器和 IDE 進行集成.
從這個開發工具箱的2.2.1版本開始,JCWDE 支持 Java Card RMI(JCRMI).請注意 JCWDE 不是一個成熟的 Java Card 模擬器.它還不支持 JCRE 的許多功能,例如軟體包安裝、applet 實例創建、防火牆和事務.要了解更多信息,請參考開發工具箱的《用戶指南》.
C 語言 Java Card 運行時環境(C-JCRE)是一個用 C 語言編寫的可執行參考實現.C-JCRE 是 Java Card API、VM 和運行時環境的完全兼容的實現.它能讓開發人員在工作站環境下準確地測試 applet 的行為.
Java Card 轉換工具,用於生成 CAP 文件.
Java Card 檢驗器,用於可選地檢查 CAP 和導出文件的有效性.
一個用於發送和接收應用程序協議數據單元(APDU)的 APDU 工具(apdutool).這就是測試期間如何將 APDU 發送給 Java Card applet 的過程.您可以創建 apdutool 讀取的腳本文件,以便將 APDU 發送到 C-JCRE 或 JCWDE.
一個 capdump工具,用於轉儲 CAP 的內容和一個列印 EXP 文件的 exp2text.
一個 scriptgen 工具,用於將 CAP 文件轉換為 APDU 腳本文件.該工具簡稱為卡片外部安裝程序.
支持庫(用於 Java Card API 的類文件和導出文件)、文檔和示例.
雖然 Sun Java Card 開發工具箱允許編寫並測試 Java Card applet,部署真正的端到端智能卡應用程序卻要求這些工具不被包含在開發工具箱內,例如:像 OpenCard 和 Global Platform API 這樣的終端 API 的使用.可能還要求使用像用戶識別模塊(Subscriber Identification Module,SIM)這樣的工具箱來幫助你管理 SIM.
表 1 顯示了工具箱的目錄結構(Windows 版本),以及包含開發工具的 bin 目錄內容.
圖 1a. 開發工具箱目錄結構
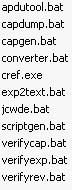
圖 1b. Bin 目錄的內容
現在讓我們重新訪問 Java Card 開發步驟,記住這次要使用 Sun Java Card 開發工具箱:
使用您喜歡的編輯器或 IDE 編寫 Java 源代碼.
使用您喜歡的編譯器或 IDE 編譯 源代碼.
使用 JCWDE 模擬器測試 Java Card applet.這是一個可選的步驟.請記住 JCWDE 不是一個成熟的 Java Card 模擬器.
使用工具箱中 bin 目錄中的 轉換器 工具將類文件轉換 為 Converted Applet(CAP).請注意,除了類文件之外,向轉換工具的另一個輸入為 導出文件,提供由應用程序所導入軟體包的相關信息;這些軟體包還會被載入到卡片中.導出文件還是轉換器工具的一個輸出結果.
驗證 CAP 的有效性.這一步是可選的.這一步包括使用 verifycap 腳本來驗證 CAP 文件的有效性,使用 verifyexp 來驗證導出文件,並且使用 verifyrev 驗證軟體包修訂版本間的二進位兼容性.工具 verifycap、verifyexp 和 verifyrev 腳本都在 bin 目錄中可以找到.
安裝 CAP 文件.使用 scriptgen 工具將 CAP 文件轉換為(安裝) APDU 腳本文件.然後使用 apdutool 將腳本文件(安裝 APDU 命令和 CAP 文件)發送到 Java Card 設備上的 C-JCRE 或 JCRE.JCRE 將 CAP 文件保存卡片內存中.
下列圖總結了這些步驟.請注意,每個Java Card 供應商提供自己的工具,但是開發 Java Card applet 的步驟通常在開發工具箱之間是相同的:
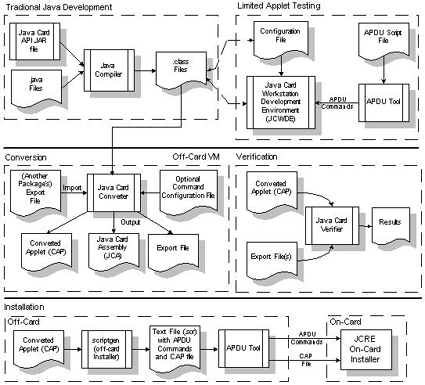
圖 2. Java Card 開發步驟
要了解關於如何使用 Sun 的 Java Card 開發工具箱方面的更多信息,請參見《 Java Card 開發工具箱用戶指南 》,從中找到工具箱文檔目錄.另一個優秀的參考資料是文章「使用 Java Card 開發工具箱」.
編寫卡片端 Java Card Applet
Sun 提供了兩個模型用來編寫 Java Card applet(javacard.framework.Applet):傳統的 Java Card API 或者 Java Card 遠程方法調用(JCRMI) API.我們可以使用其中任何一個模型來編寫 Java Card applet.
使用 Java Card API
開發 Java Card applet 是一個兩步完成的過程:
定義負責主機應用程序和 applet 之間介面的 APDU 命令和響應.
編寫 Java Card applet 本身
 ,讓我們看一下 Java Card applet 的結構.
Applet 結構
清單 1 說明了構造 Java Card applet 的方式:
| import javacard.framework.* ... public class MyApplet extends Applet { // Definitions of APDU-related instruction codes ... MyApplet() {...} // Constructor // Life-cycle methods install() {...} select() {...} deselect() {...} process() {...} // Private methods ... } |
清單 1. Java Card Applet 的結構
Java Card applet 通常定義它的 APDU 相關指令、它的構造函數和 Java Card applet 生命周期方法:install()、select()、deselect() 和 process(). ,它還定義任意適當的專用方法.
定義 APDU 指令
不同的 Java Card 應用程序具有不同的介面(APDU)需求.信用卡 applet 可能支持驗證 PIN 號的方式,完成信用和借記事務,並檢查帳戶的卡片餘額.健康保險 applet 可能提供對健康保險信息、保險總額限制、醫生、病人信息等內容的訪問.需要根據應用程序的需求定義的準確的 APDU .
舉例來說,讓我們完成經典的 Wallet 信用卡示例的一些部分.您能在 Sun Java Card 開發工具箱中的示例目錄下發現本示例和其他示例的完整源代碼.
,我們定義一個 APDU 命令來查詢存儲在 Java Card 設備中的當前卡片餘額數.請注意,在實際信用卡應用程序中,我們還要定義信用卡和借記卡命令.我們將為 Get Balance APDU 分配一個 0x80 的指令類和一個 0x30 指令.Get Balance APDU 不需要任何指令參數或數據欄位,並且預期的響應由包含卡片餘額的兩個位元組.下一個表格描述了 Get Balance APDU 命令:
表 1 — Get Balance APDU 命令
| Name | CLA | INS | P1 | P2 | Lc | Data Field | Le (size of response) |
| Get Balance | 0x80 | 0x30 | 0 | 0 | N/A | N/A | 2 |
雖然 Get Balance 命令並不定義傳入的數據,但是一些 APDU 命令會定義傳入的數據.下面給出一個示例.讓我們定義 Verify PIN APDU 命令,它驗證從卡片讀取器中傳遞來的 PIN 號.下一個表格定義了 Verify APDU:
表 2 — Verify APDU 命令
| 名稱 | CLA | INS | P1 | P2 | Lc | Data Field | Le (size of response) |
| 驗證 PIN | 0x80 | 0x20 | 0 | 0 | PIN Len | PIN Value | N/A |
請注意,Le 欄位、響應的大小是 N/A.這是由於不存在特定於應用程序的響應對 PIN 進行驗證;成功或失敗通過響應中 APDU 的狀態字顯示.
為了便於 APDU 處理,javacard.framework.ISO7816 介面定義了許多常量,我們可以用來從輸入緩衝器中檢索各個 APDU 欄位,其中輸入緩衝器通過 process() 方法被傳遞到 applet.
| ... byte cla = buf[ISO7816.OFFSET_CLA]; byte ins = buf[ISO7816.OFFSET_INS]; byte p1 = buf[ISO7816.OFFSET_P1]; byte p2 = buf[ISO7816.OFFSET_P2]; byte lc = buf[ISO7816.OFFSET_LC]; ... // Get APDU data, by copying lc bytes from OFFSET_CDATA, into // reusable buffer databuf. Util.arrayCopy(buf, ISO7816.OFFSET_CDATA, databuf, 0, lc); ... |
清單 2. 使用 ISO-7816-4 常量
現在,我們將定義類(CLA)和指令(INS),用於 Get Balance 和 Verify 命令,所獲取卡片餘額響應的大小,以及如果 PIN 驗證失敗所返回的錯誤代碼.
| ... // MyApplet APDU definitions final static byte MyAPPLET_CLA = (byte)0x80; final static byte VERIFY_INS = (byte)0x20; final static byte GET_BALANCE_INS = (byte) 0x30; final static short GET_BALANCE_RESPONSE_SZ = 2; // Exception (return code) if PIN verify fails. final static short SW_PINVERIFY_FAILED = (short)0x6900; ... |
清單 3. Applet 的 APDU 定義
接下來,讓我們定義一些 applet 構造函數和生命周期方法.
構造函數
定義一個初始化對象狀態的專用構造函數.從 install() 方法中調用該構造函數;換句話說,構造函數在 applet 生命周期內只被調用一次.
| /** * Private Constructor. */ private MyApplet() { super(); // ... Allocate all objects needed during the applet's // lifetime. ownerPin = new OwnerPIN(PIN_TRY_LIMIT, MAX_PIN_SIZE); ... // Register this applet instance with the JCRE. register(); } |
清單 4. Applet 構造函數
install() 方法
JCRE 在安裝過程中調用 install().您必須覆蓋這個從 javacard.framework.Applet 類中繼承的方法,且 install() 方法必須實例化 applet,如下所示:
| /** * Installs the Applet. Creates an instance of MyApplet. The * JCRE calls this static method during applet installation. * @param bArray install parameter array. * @param bOffset where install data begins. * @param bLength install parameter data length. * @throw ISOException if the install method fails. */ public static void install(byte[] bArray, short bOffset, byte bLength) throws ISOException { // Instantiate MyApplet new MyApplet(); ... } |
清單 5. install() Applet 生命周期方法
install() 方法必須直接或間接調用 register() 方法來完成安裝;如果這步失敗將導致安裝失敗.在這個示例中,構造函數調用 register().
select() 方法
JCRE 調用 select() 以便通知 applet 已經被選中用於 APDU 處理.除非想提供會話初始化或個性化,否則不必實現該方法.select() 方法必須返回true以便指示準備就緒可以處理傳入的 APDU,或返回 false 以便拒絕選擇.通過 javacard.framework.Applet 類默認實現返回 true.
| /** * Called by the JCRE to inform this applet that it has been * selected. Perform any initialization that may be required to * process APDU commands. This method returns a boolean to * indicate whether it is ready to accept incoming APDU commands * via its process() method. * @return If this method returns false, it indicates to the JCRE * that this Applet declines to be selected. */ public boolean select() { // Perform any applet-specific session initialization. return true; } |
清單 6. select() Applet 生命周期方法
deselect() 方法
JCRE 調用 deselect() 來通知 applet 已經被取消選中.除非想提供會話清除,否則不必實現該方法.通過 javacard.framework.Applet 類默認實現不會返回任何值.
| /** * Called by the JCRE to inform this currently selected applet * it is being deselected on this logical channel. Performs * the session cleanup. */ public void deselect() { // Perform appropriate cleanup. ownerPin.reset(); } |
清單 7. deselect() Applet 生命周期方法
在本示例中,我們將重置 PIN.
process() 方法 — 與 APDU 協同工作
一旦 applet 已經被選擇,它就準備接收 APDU 命令,如 第 1 部分 中「Java Card Applet 的生命周期」一節中所述.
回想一下,APDU 命令從主機端(客戶機端)應用程序中被發送到卡片上,如下所示:
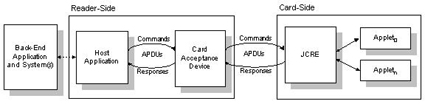
圖 3. APDU 命令、主機應用程序和 Java Card Applet 之間的響應流程
每當 JCRE 接收到 APDU 命令(從主機應用程序通過卡片讀取器完成,或者如果使用 Sun Java Card 開發工具箱時通過 apdutool 完成)時,JCRE 調用 applet 的 process() 方法,將之作為一個參數傳遞給傳入的命令(該參數位於 APDU 命令輸入緩衝器中).然後 process() 方法執行下列操作:
提取 APDU CLA 和 INS 欄位
檢索特定於應用程序的 P1、P2 和數據欄位
處理 APDU 數據
生成併發送響應
適度返回或拋棄適當的 ISO 異常.
此時,JCRE 通過卡片讀取器向主機應用程序發送適當的狀態字.
清單 8 顯示了 process() 方法的一個示例.
| /** * Called by the JCRE to process an incoming APDU command. An * applet is expected to perform the action requested and return * response data if any to the terminal. * * Upon normal return from this method the JCRE sends the ISO- * 7816-4-defined success status (90 00) in the APDU response. If * this method throws an ISOException the JCRE sends the * associated reason code as the response status instead. * @param apdu is the incoming APDU. * @throw ISOException if the process method fails. */ public void process(APDU apdu) throws ISOException { // Get the incoming APDU buffer. byte[] buffer = apdu.getBuffer(); // Get the CLA; mask out the logical-channel info. buffer[ISO7816.OFFSET_CLA] = (byte)(buffer[ISO7816.OFFSET_CLA] & (byte)0xFC); // If INS is Select, return - no need to process select // here. if ((buffer[ISO7816.OFFSET_CLA] == 0) && (buffer[ISO7816.OFFSET_INS] == (byte)(0xA4)) ) return; // If unrecognized class, return "unsupported class." if (buffer[ISO7816.OFFSET_CLA] != MyAPPLET_CLA) ISOException.throwIt(ISO7816.SW_CLA_NOT_SUPPORTED); // Process (application-specific) APDU commands aimed at // MyApplet. switch (buffer[ISO7816.OFFSET_INS]) { case VERIFY_INS: verify(apdu); break; case GET_BALANCE_INS: getBalance(apdu); break; default: ISOException.throwIt(ISO7816.SW_INS_NOT_SUPPORTED); break; } } |
清單 8. process() Applet 生命周期方法
process() 方法調用 getBalance() 和 verify() 方法.清單 9 顯示了處理獲取卡片餘額 APDU 的方法 getBalance(),並將卡片餘額返回並保存在卡片內.
| /** * Retrieves and returns the balance stored in this card. * @param apdu is the incoming APDU. */ private void getBalance(APDU apdu) { // Get the incoming APDU buffer. byte[] buffer = apdu.getBuffer(); // Set the data transfer direction to outbound and obtain // the expected length of response (Le). short le = apdu.setOutgoing(); // If the expected size is incorrect, send a wrong-length // status word. if (le != GET_BALANCE_RESPONSE_SZ) ISOException.throwIt(ISO7816.SW_WRONG_LENGTH); // Set the actual number of bytes in the response data field. apdu.setOutgoingLength((byte)GET_BALANCE_RESPONSE_SZ); // Set the response data field; split the balance into 2 // separate bytes. buffer[0] = (byte)(balance >> 8); buffer[1] = (byte)(balance & 0xFF); // Send the 2-byte balance starting at the offset in the APDU // buffer. apdu.sendBytes((short)0, (short)GET_BALANCE_RESPONSE_SZ); } |
清單 9. 處理 Get Balance APDU
getBalance() 方法通過調用 APDU.getBuffer() 方法獲得對 APDU 緩衝器的引用.在返迴響應(當前的卡片餘額)前,applet 設置 JCRE 的模式以便通過調用方便返回預期響應大小的 APDU.setOutgoing() 方法發送.通過調用 APDU.setOutgoingLenth(),我們還必須設置在響應數據欄位中位元組的實際個數.在 APDU 緩衝器中的響應實際上通過調用 APDU.sendBytes() 發送.
Applet 並不直接返回代碼(狀態字);一旦 applet 調用 APDU.setOutgoing() 並提供所請求的信息,JCRE 便負責這項操作.狀態字的值根據 process() 方法返回到 JCRE 的方式而發生變化.如果一切進展順利,JCRE 將返回 9000,指示沒有錯誤.Applet 可以通過拋出在 ISO7816 介面中所定義的一種異常或者應用程序制定的值來返回錯誤代碼.在清單 9 中,如果預期響應不正確,方法 getBalance() 會拋出一個 ISO7816.SW_WRONG_LENGTH 代碼.有效的狀態代碼值參考 ISO7816 介面的定義,或參考本文中第一部分中「響應 APDU」一節.
現在讓我們查看一下清單 10 中的 verify() 方法. 我們定義了 verify PIN APDU 命令要包含數據,因此 verify() 方法必須調用設置 JCRE 為接收模式的 APDU.setIncomingAndReceive() 方法,然後接收傳入的數據.
| /** * Validates (verifies) the Owner's PIN number. * @param apdu is the incoming APDU. */ private void verify(APDU apdu) { // Get the incoming APDU buffer. byte[] buffer = apdu.getBuffer(); // Get the PIN data. byte bytesRead = (byte)apdu.setIncomingAndReceive(); // Check/verify the PIN number. Read bytesRead number of PIN // bytes into the APDU buffer at the offset // ISO7816.OFFSET_CDATA. if (ownerPin.check(buffer, ISO7816.OFFSET_CDATA, byteRead) == false ) ISOException.throwIt(SW_PINVERIFY_FAILED); } |
清單 10. 處理 Verify APDU
這個方法通過調用 APDU.getBuffer() 獲得對 APDU 緩衝器的引用,調用APDU.setIncomingAndReceive() 來接收命令數據,從傳入的 APDU 緩衝器中獲取 PIN 數據並驗證 PIN.驗證失敗將引起狀態代碼 6900 被發送回主機應用程序.
有時所傳入的數據會超過 APDU 緩衝器的數據容量,applet 必須以塊的形式讀取數據,直到不再有要讀取的數據.在這種情況下,我們必須調用 APDU.setIncomingAndReceive() 然後調用 APDU.receiveBytes(),反覆執行上述操作直到沒有可用的數據.清單 11 顯示了如何讀取大量的傳入數據.
| ... byte[] buffer = apdu.getBuffer(); short bytes_left = (short) buffer[ISO.OFFSET_LC]; short readCount = apdu.setIncomingAndReceive(); while (bytes_left > 0) { // Process received data in buffer; copy chunk to temp buf. Util.arrayCopy(buffer, ISO.OFFSET_CDATA, tbuf, 0, readCount); bytes_left -= readCount; // Get more data readCount = apdu.receiveBytes(ISO.OFFSET_CDDATA); } ... |
清單 11. 讀取大量的傳入數據
當每個塊被讀取時,applet 只得將其附加到另一個緩衝器上,否則只好處理它.
使用 Java Card RMI API
第二個可以進行 Java Card applet 編程的模型是基於 J2SE RMI 分散式對象模型的 Java Card RMI(JCRMI).
該方法提供了以對象為中心的模型,其中 APDU 通信和處理在前面一節中被抽象化;而現在您需要處理這些對象.這一過程可以簡化了基於 Java Card 技術的設備編程和集成.
Java Card RMI 簡介
兩個軟體包提供了對 Java Card RMI 的支持:
java.rmi 定義了 Java 2 標準版 java.rmi 軟體包的子集.它還定義了 Remote 介面和 RemoteException 類.除此之外,不包含其它傳統的 java.rmi 類.
javacard.framework.service 定義了 Java Card applet 服務類,其中包括 RMI 服務類 CardRemoteObject 和 RMIService.
類 CardRemoteObject 定義了兩種方法來啟用和禁用對來自卡片外部的 對象 的遠程訪問.類 RMIService 處理 RMI 請求(將傳入的 APDU 命令轉換為遠程方法調用).
編寫 JCRMI 應用程序類似於編寫典型的基於 RMI 的應用程序:
將遠程類的行為設為一個介面.
編寫遠程類的伺服器實現和支持類.
編寫一個使用遠程服務的客戶機程序和支持類.
請注意,正如您稍候將要看到的,JCRMI 不改變 applet 的基本結構和生命周期.
遠程介面
創建遠程服務的第一步是定義它的可見行為.遠程介面定義 applet 提供的服務.正如標準 J2SE RMI 中規定的那樣,所有 Java Card RMI 遠程介面必須擴展 java.rmi.Remote 介面.要詳細說明這一點,在此給出一個遠程介面,公開獲取卡片餘額並將之保存在卡片里的方法.
| import java.rmi.*; import javacard.framework.*; public interface MyRemoteInterface extends Remote { ... public short getBalance() throws RemoteException; ... // A complete credit card application would also define other // methods such as credit() and debit() methods. ... } |
清單 12. 遠程介面
MyRemoteInterface 定義了檢索存儲在智能卡中卡片餘額的遠程方法,在本示例中為 getBalance() 方法.請注意,除了特定於 Java Card 的導入之外,這個遠程介面看起來完全象一個標準的 RMI 遠程介面.
伺服器實現
下一步是實現伺服器的行為.伺服器實現由 Java Card applet、已經定義的任意遠程介面的實現和任意特定於應用程序的相關類組成.
Java Card Applet
Java Card applet 是一個 JCRMI 伺服器,並且是可用於主機(客戶機)應用程序的遠程對象的所有者.在下面的圖中解釋了典型的 Java Card RMI applet 結構:
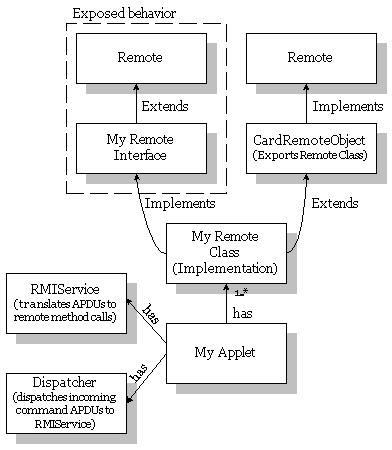
圖 4. 典型的 Java Card RMI Applet 的結構
當與顯式處理 APDU 消息的 applet 比較時,基於 JCRMI 的 applet 更像一個對象容器.正如您在圖 4 中看到的,基於 JCRMI 的 applet 有一個或多個遠程對象,一個 APDU Dispatcher 和一個接收 APDU 並將它們轉換為遠程方法調用的 RMIService.Java Card 遠程類可以擴展 CardRemoteObject 類,以便自動導出對象,是的遠程應用為可見狀態.
JCRMI applet 必須擴展 javacard.framework.Applet,遵循標準的 applet 結構,並定義適當的生命周期方法.還必須安裝和自我註冊,並分發 APDU.下列代碼片斷說明一個基於 JCRMI 的 applet 的典型結構:
| public class MyApplet extends javacard.framework.Applet { private Dispatcher disp; private RemoteService serv; private Remote myRemoteInterface; /** * Construct the applet. Here instantiate the remote * implementation(s), the APDU Dispatcher, and the * RMIService. Before returning, register the applet. */ public MyApplet () { // Create the implementation for my applet. myRemoteInterface = new MyRemoteInterfaceImpl(); // Create a new Dispatcher that can hold a maximum of 1 // service, the RMIService. disp = new Dispatcher((short)1); // Create the RMIService serv = new RMIService(myRemoteInterface); disp.addService(serv, Dispatcher.PROCESS_COMMAND); // Complete the registration process register(); } ... |
Applet 創建一個 Dispatcher 和 RMIService 來處理傳入的 JCRMI APDU.
| ... /** * Installs the Applet. Creates an instance of MyApplet. * The JCRE calls this static method during applet * installation. * @param bArray install parameter array. * @param bOffset where install data begins. * @param bLength install parameter data length. */ public static void install(byte[] aid, short s, byte b) { new MyApplet(); } |
在 Java Card 環境下,JVM 的生命周期是物理卡片的生命周期,且不是所有的 Java Card 實現都提供垃圾收集器,因此有必要最大限度減少內存分配.對象在安裝時創建,因此,只一次性向這些對象分配內存.
| /** * Called by the JCRE to process an incoming APDU command. An * applet is expected to perform the action requested and * return response data, if any. * * This JCRMI version of the applet dispatches remote * invocation APDUs by invoking the Dispatcher. * * Upon normal return from this method the JCRE sends the ISO- * 7816-4-defined success status (90 00) in the APDU response. * If this method throws an ISOException, the JCRE sends the * associated reason code as the response status instead. * @param apdu is the incoming APDU. * @throw ISOException if the install method fails. */ public void process(APDU apdu) throws ISOException { // Dispatch the incoming command APDU to the RMIService. disp.process(apdu); } } |
Applet 的 process() 接收了一個 APDU 命令並將該命令分發給 RMIService,RMIService 通過將該命令轉換為 RMI 調用和後續響應而進行處理.
清單 13. Java Card RMI Applet
實現 Remote 對象
實現 JCRMI 遠程對象類似於實現標準的 J2SE RMI 遠程對象.二者的主要不同之處在於,在 JCRMI 中,遠程對象有擴展 CardRemoteObject (除了實現遠程介面之外)的選擇.
CardRemoteObject 定義了兩種方法,export() 和 unexport(),分別用於啟用和禁用對來自卡片外部對象的訪問.通過擴展 CardRemoteObject,可以自動導出遠程對象的所有方法.如果決定不擴展 CardRemoteObject,您將負責通過調用 CardRemoteObject.export() 將它們導出.
| import java.rmi.RemoteException; |
清單 14. 遠程對象實現
完整的 Java Card RMI 應用程序流程
現在讓我們總結一下 JCRMI 應用程序的流程圖.客戶機(主機)應用程序通過將 RMI APDU 傳遞給卡片內部的 JCRE,繼而依次將這些 APDU 轉發給適當的 JCRMI applet 來調用 RMI.這個 applet 將所接收到的 APDU 分發給 RMIService,繼而依次處理 APDU 並將其轉換為 RMI 調用.JCRMI applet 的典型流程如下所示:
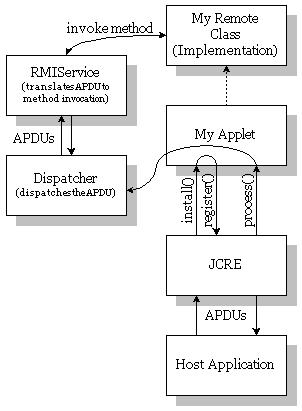
圖 5. 基於 Java Card RMI 的 Applet 的流程
簡言之,熟練運用基於 APDU 的消息傳遞模型,JCRMI 提供了一個分發模型機制.JCRMI 消息被封裝在被傳遞到 RMIService 的 APDU 消息內.RMIService負責解碼 APDU 命令,將它們轉換為方法調用和響應.這是的伺服器往複地和客戶機通信、傳遞方法信息、參數並返回值.
結束語
「Java Card 技術簡介」的第 2 部分介紹了 Java Card applet 開發的方方面面:Java Card applet 的結構、Sun Java Card 開發工具箱、API 和可用於編寫 applet 的編程模型:Java Card API 和 Java Card RMI API.
使用 Java Card 技術的智能卡具備最佳的可移植性,它是攜帶數字個人信息計算功能的安全方式;在當今的數字世界中,它是一項強大的必備技術.
[火星人 ] Java Card 技術簡介:第 2 部分,Java Card Applet已經有1519次圍觀
