Lift 是一種新的 Web 應用程序框架。它是一種在 Scala 編程語言上構建的可伸縮框架。它非常適合 Apache Geronimo 這樣的可伸縮應用伺服器,尤其是在 Scala 編譯為與 Java™ 語言非常相似的位元組碼並使用 Java 平台之後。在本文中,學習如何用 Lift 創建 Web 應用程序並把它部署到 Geronimo。
Lift Web 應用程序框架需要 Scala,而 Scala 依賴於 Java Development Kit,所以也需要安裝 Java Development Kit。下面是編寫本文時使用的軟體。
Lift 是用 Scala 編寫的,但是本文不要求您熟悉 Scala。需要熟悉 Java 語言和 Java Web 編程。熟悉 Maven 會有幫助,因為 Lift 在許多方面都使用 Maven。
為什麼要使用 Lift
在討論如何下載庫和執行腳本之前,應該先談談為什麼要使用 Lift。畢竟,現在有許多其他 Web 框架,其中一部分也可以在 Geronimo 中使用。本文將討論重要的 Lift 結構,包括片段和模型,以此說明用 Lift 創建和測試 Web 應用程序是多麼容易。
Java Web 程序員有許多可供選擇的 Web 框架。一些人甚至認為現在的 Web 框架太多了,讓人無所適從。那麼,在眾多的 Web 框架中,Lift 處於什麼位置呢?Lift 是用 Scala 編寫的,而不是 Java。儘管 Scala 編譯為 Java 位元組碼,但是與在 JVM 上運行的許多動態語言不同,它並不是某種包裝器代碼。Scala 是一種靜態類型語言,作為快速的 “原生” Java 運行。這應該不令人吃驚,因為 Scala 的創建者曾經編寫過 Java 編譯器。因此,Scala 是一種表達能力比 Java 強得多的語言,但是它在 JVM 上運行,運行速度與 Java 一樣快。這些性質使它非常適合實現 Web 框架 —— 這種強大的語言使我們編寫的代碼更少,同時保持出色的性能。
Scala 是非常出色的,那麼 Lift 呢?Lift 充分利用了 Scala 的優點。它可以在任何 Java Web 容器中運行,因為它使用標準的 Java servlet 和 servlet 過濾器。Lift 的片段和模型充分利用了靈活的 Scala 語法。通過使用 Scala 的基於 actor 的併發系統,Lift 還能夠出色地執行 Comet 風格的 Ajax。您不相信嗎?我們來看看用 Lift 創建 Web 應用程序是多麼容易。
  |
創建 Lift 應用程序
任何 Web 應用程序框架首先需要下載,對嗎?Lift 就不是這樣。Lift 使用 Maven 完成所有工作,而且初始設置沒有差異。但是,在開始使用 Maven 之前,一定要設置 SCALA_HOME 環境變數。然後執行以下命令。
$ mvn archetype:generate -U -DarchetypeGroupId=net.liftweb -DarchetypeArtifactId=lift-archetype-basic -DarchetypeVersion=0.8 -DremoteRepositories=http://scala-tools.org/repo-releases -DgroupId=org.developerworks.lift -DartifactId=quepasa [INFO] Scanning for projects... [INFO] Searching repository for plugin with prefix: 'archetype'. [INFO] org.apache.maven.plugins: checking for updates from central [INFO] org.codehaus.mojo: checking for updates from central [INFO] artifact org.apache.maven.plugins:maven-archetype-plugin: checking for updates from central [INFO] ------------------------------------------------------------------------ [INFO] Building Maven Default Project [INFO] task-segment: [archetype:generate] (aggregator-style) [INFO] ------------------------------------------------------------------------ [INFO] Preparing archetype:generate [INFO] No goals needed for project - skipping [INFO] Setting property: classpath.resource.loader.class => 'org.codehaus.plexus.velocity.ContextClassLoaderResourceLoader'. [INFO] Setting property: velocimacro.messages.on => 'false'. [INFO] Setting property: resource.loader => 'classpath'. [INFO] Setting property: resource.manager.logwhenfound => 'false'. [INFO] [archetype:generate] [INFO] Generating project in Interactive mode [INFO] Archetype repository missing. Using the one from [net.liftweb:lift-archetype-basic:0.6 -> http://scala-tools.org/repo-releases] found in catalog internal Define value for version: 1.0-SNAPSHOT: : 0.1 Confirm properties configuration: groupId: org.developerworks.lift artifactId: quepasa version: 0.1 package: org.developerworks.lift Y: : y [INFO] ---------------------------------------------------------------------------- [INFO] Using following parameters for creating OldArchetype: lift-archetype-basic:0.8 [INFO] ---------------------------------------------------------------------------- [INFO] Parameter: groupId, Value: org.developerworks.lift [INFO] Parameter: packageName, Value: org.developerworks.lift [INFO] Parameter: basedir, Value: /Users/michael/code/lift [INFO] Parameter: package, Value: org.developerworks.lift [INFO] Parameter: version, Value: 0.1 [INFO] Parameter: artifactId, Value: quepasa [INFO] ********************* End of debug info from resources from generated POM *********************** [INFO] OldArchetype created in dir: /Users/michael/code/lift/quepasa [INFO] ------------------------------------------------------------------------ [INFO] BUILD SUCCESSFUL [INFO] ------------------------------------------------------------------------ [INFO] Total time: 8 seconds [INFO] Finished at: Wed May 21 21:49:56 PDT 2008 [INFO] Final Memory: 8M/14M [INFO] ------------------------------------------------------------------------ |
這個命令讓 Maven 替我們生成一個應用程序。這是應用程序框架中的一個常見特性,最初是由 Ruby on Rails 實現的。在這裡,可以通過幾個選項指定要創建的應用程序骨架的類型。每種應用程序類型對應於一個原型(archetype),groupId、artifactId 和版本惟一地標識了原型和要創建的應用程序骨架。remoteRepositories 參數向 Maven 指出要使用的 Maven 存儲庫。最後兩個參數(groupId 和 artifactId)對於您的應用程序是惟一的。在這裡,我們使用 org.developerworks.lift 和 quepasa 作為參數值,但是您應該在這裡設置自己的值。
仔細看看清單 1,應該會看到幾個粗體行。這實際上是 Maven 產生的用戶提示。它要求輸入應用程序的版本和應用程序的包名。輸入之後,它會替您創建應用程序骨架。完成之後,應該會看到與圖 1 相似的結構。
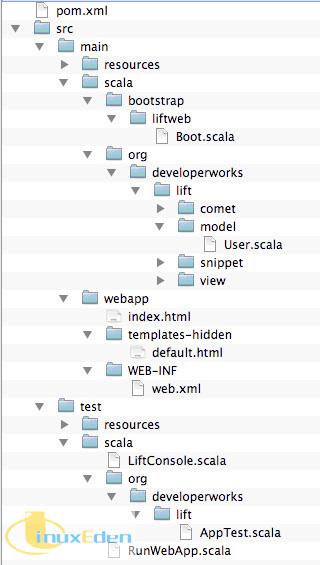
這就是 Lift 應用程序的結構。/src/main 是放置所有 Scala 代碼的地方。在這裡可以找到 Boot 類,這個類定義應用程序的許多配置參數。在 Boot 類中還有 XML 配置文件中常見的一些內容。
/webapp 目錄是放置 Web 工件的地方,比如 HTML、JavaScript 和 CSS。那麼 JSP 或等效的東西呢?根據設計,在 Lift 中沒有這樣的東西。在 Lift 中,使用包含一些擴展標記的 XHTML 文件,擴展標記讓 Scala 能夠注入動態內容。採用片段的形式提供內容。
在 /webapp 目錄中還應該注意兩個東西。第一個是 WEB-INF 目錄。這是 Java Web 開發中典型的 WEB-INF。部署 Lift 應用程序的方法是,把它打包為 WAR 文件併發送給 Java Web 容器(比如 Geronimo)。還要注意 templates-hidden 目錄。這裡是放置應用程序的 “主” 模板的地方。可以通過模板輕鬆地對外觀和感覺做全局修改。
既然已經創建了基本的 Lift 應用程序,就可以開始添加更多特性了。Lift 採用以視圖為中心的 Web 開發方式。首先要創建視圖,而不是模型和控制器。因此,我們首先在應用程序中添加一個頁面。
添加頁面
在 Lift 中創建視圖並不需要運行任何腳本。視圖僅僅是 HTML 文件,所以只需在 /webapp 目錄中創建一個新的 HTML 文件。下面給出一個簡單的表單。
<lift:surround with="default" at="content"> <div class="heading" id="title">¿Qué pasa?</div> <form method="POST"> <label for="update">What's going on? </label> <input type="text" name="update"/> <input type="submit" value="update"/> </form> </lift:surround> |
這裡惟一的特殊內容是 lift:surround 標記。還記得前面提到的模板嗎?這個標記就調用這個模板。lift:surround 讓 Lift 使用一個稱為 “surround” 的片段。這是 Lift 包含的一個標準片段。它與 JSP 中的定製標記相似,至少在語法方面是相似的。在這裡,我們使用默認模板。這會引入 default.html 模板中定義的所有標準 HTML 內容,比如 HTML 頭和體標記等等。可以修改默認模板或創建自己的模板,並通過 surround 模板引用它。
為了在應用程序中添加新頁面,還需要做一項工作。前面提到 Boot 類,以及如何用它定義配置數據。它定義的配置之一是一個站點地圖,所以需要在站點地圖中添加新的 HTML 頁面,見清單 3。
package bootstrap.liftweb import net.liftweb.util._ import net.liftweb.http._ import net.liftweb.sitemap._ import net.liftweb.sitemap.Loc._ import Helpers._ import net.liftweb.mapper.{DB, ConnectionManager, Schemifier, DefaultConnectionIdentifier, ConnectionIdentifier} import java.sql.{Connection, DriverManager} import org.developerworks.lift.model._ /** * A class that's instantiated early and run. It allows the application * to modify lift's environment */ class Boot { def boot { if (!DB.jndiJdbcConnAvailable_?) DB.defineConnectionManager (DefaultConnectionIdentifier, DBVendor) // where to search snippet LiftRules.addToPackages("org.developerworks.lift") Schemifier.schemify(true, Log.infoF _, User) LiftRules.addTemplateBefore(User.templates) // Build SiteMap val entries = Menu(Loc("Home", "/", "Home")) :: Menu(Loc("update", "/update", "The Update Page")) :: Nil LiftRules.setSiteMap(SiteMap(entries:_*)) S.addAround(User.requestLoans) } } object DBVendor extends ConnectionManager { def newConnection(name: ConnectionIdentifier): Can[Connection] = { try { Class.forName("org.apache.derby.jdbc.EmbeddedDriver") val dm = DriverManager.getConnection("jdbc:derby:quepasa;create=true") Full(dm) } catch { case e : Exception => e.printStackTrace; Empty } } def releaseConnection(conn: Connection) {conn.close} } |
站點地圖在 entries 值中設置。使用 :: 表示法創建一個列表字面值。這裡已經有一個 “Home” 條目,它映射到 “/”(index.html 頁面)。Nil 表示列表的結尾。
我們已經創建了一個頁面並把它添加到站點地圖中,現在來測試這個應用程序。在使用 Lift 時,測試是非常容易的。
測試應用程序
測試 Lift 應用程序之前應該先對代碼進行打包,然後啟動資料庫和應用伺服器,對嗎?別著急。與許多現代 Java Web 框架一樣,Lift 使用嵌入的資料庫(Derby)和嵌入的 Web 容器(Jetty)。因此,不需要打包或外部軟體,也可以測試應用程序。我們只需使用 Maven,如下所示:
$ mvn jetty:run -U [INFO] Scanning for projects... [INFO] Searching repository for plugin with prefix: 'jetty'. [INFO] org.apache.maven.plugins: checking for updates from scala-tools.org [INFO] org.apache.maven.plugins: checking for updates from central [INFO] org.codehaus.mojo: checking for updates from scala-tools.org [INFO] org.codehaus.mojo: checking for updates from central [INFO] artifact org.scala-tools:maven-scala-plugin: checking for updates from scala-tools.org [INFO] artifact org.scala-tools:maven-scala-plugin: checking for updates from central [INFO] artifact org.mortbay.jetty:maven-jetty-plugin: checking for updates from scala-tools.org [INFO] artifact org.mortbay.jetty:maven-jetty-plugin: checking for updates from central [INFO] artifact net.sf.alchim:yuicompressor-maven-plugin: checking for updates from scala-tools.org [INFO] artifact net.sf.alchim:yuicompressor-maven-plugin: checking for updates from central [INFO] artifact org.apache.maven.plugins:maven-eclipse-plugin: checking for updates from scala-tools.org [INFO] artifact org.apache.maven.plugins:maven-eclipse-plugin: checking for updates from central [INFO] ------------------------------------------------------------------------ [INFO] Building quepasa [INFO] task-segment: [jetty:run] [INFO] ------------------------------------------------------------------------ [INFO] Preparing jetty:run [INFO] [resources:resources] [INFO] Using default encoding to copy filtered resources. [INFO] [yuicompressor:compress {execution: default}] [INFO] nb warnings: 0, nb errors: 0 [INFO] artifact org.mortbay.jetty:jetty: checking for updates from scala-tools.org [INFO] artifact org.mortbay.jetty:jetty: checking for updates from central [INFO] [compiler:compile] [INFO] Nothing to compile - all classes are up to date [INFO] [scala:compile {execution: default}] [INFO] Compiling 2 source files to /Users/michael/code/lift/quepasa/target/classes [INFO] [resources:testResources] [INFO] Using default encoding to copy filtered resources. [INFO] [compiler:testCompile] [INFO] Nothing to compile - all classes are up to date [INFO] [scala:testCompile {execution: default}] [INFO] Compiling 3 source files to /Users/michael/code/lift/quepasa/target/test-classes [INFO] [jetty:run] [INFO] Configuring Jetty for project: quepasa [INFO] Webapp source directory = /Users/michael/code/lift/quepasa/src/main/webapp [INFO] web.xml file = /Users/michael/code/lift/quepasa/src/main/webapp/WEB-INF/web.xml [INFO] Classes = /Users/michael/code/lift/quepasa/target/classes 2008-05-23 21:19:31.149::INFO: Logging to STDERR via org.mortbay.log.StdErrLog [INFO] Context path = / [INFO] Tmp directory = determined at runtime [INFO] Web defaults = org/mortbay/jetty/webapp/webdefault.xml [INFO] Web overrides = none [INFO] Webapp directory = /Users/michael/code/lift/quepasa/src/main/webapp [INFO] Starting jetty 6.1.10 ... 2008-05-23 21:19:31.245::INFO: jetty-6.1.10 2008-05-23 21:19:31.409::INFO: No Transaction manager found - if your webapp requires one, please configure one. 2008-05-23 21:19:31.989::INFO: Started SelectChannelConnector@0.0.0.0:8080 [INFO] Started Jetty Server [INFO] Starting scanner at interval of 5 seconds. |
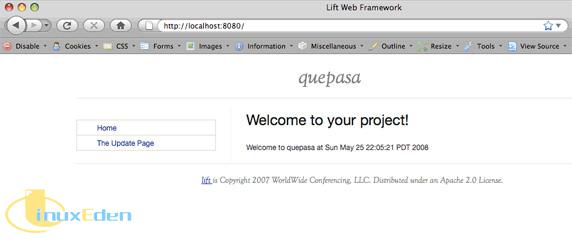
在第一次運行這個命令時,會看到 Maven 下載運行 Jetty 所需的幾個 JAR 文件。完成之後,就可以通過訪問 http://localhost:8080 啟動 Lift 應用程序。
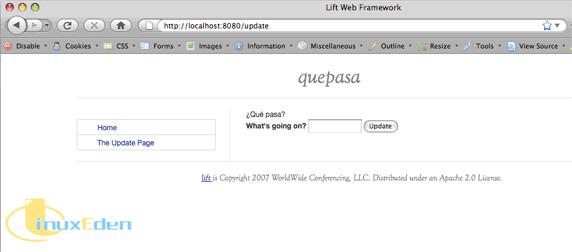
如果單擊 Update Page,應該會看到前面創建的頁面。
您可能會注意到頁面的標題和底部的鏈接。它們來自默認模板,如下所示。
<html xmlns="http://www.w3.org/1999/xhtml" xmlns:lift="http://liftweb.net/"> <head> <meta http-equiv="content-type" content="text/html; charset=UTF-8" /> <meta name="description" content="" /> <meta name="keywords" content="" /> <title>Lift Web Framework</title> <lift:CSS.blueprint /> <lift:CSS.fancyType /> <script id="jquery" src="/classpath/jquery.js" type="text/javascript"/> <script id="json" src="/classpath/json.js" type="text/javascript"/> <style> /* <![CDATA[ */ .sidebar ul { margin:0; padding:0; border-bottom:1px solid #ccc; } .sidebar ul li { margin:0; padding:0; list-style:none; border:1px solid #ccc; border-bottom:none; } .sidebar ul li a { display:block; padding:3px; text-indent:30px; text-decoration:none; } .sidebar ul li a:hover { background-color: #eee; } /* ]]> */ </style> </head> <body> <div class="container"> <div class="column span-12 last" style="text-align: right"> <h1 class="alt">quepasa</h1> </div> <hr/> <div class="column span-6 colborder sidebar"> <hr class="space" /> <lift:Menu.builder /> <div> <lift:snippet type="msgs"/> <hr class="space" /> </div> </div> <div class="column span-17 last"> <lift:bind name="content" /> </div> <hr /> <div class="column span-23 last" style="text-align: center"> <h4 class="alt"> <a href="http://liftweb.net"> <i>lift</i> </a> is Copyright 2007 WorldWide Conferencing, LLC. Distributed under an Apache 2.0 License.</h4> </div> </div> </body> </html> |
我們用來創建應用程序的 Maven 腳本生成了這個標題。可以在模板中修改標題,它會出現在所有頁面上。lift:Menu.builder 是另一個 Lift 片段。在這裡,它使用來自 Boot 類的站點地圖創建站點菜單。片段是非常強大的。它們是使 Lift 應用程序具備動態性的關鍵。我們使用了 Lift 包含的一些標準片段,下面看看如何創建定製的片段。
使用片段
Lift 是以視圖為中心的。當 Lift 遇到視圖代碼中的標記時,執行伺服器端代碼。清單 6 給出視圖代碼的更新版本。
<lift:surround with="default" at="content"> <div class="heading" id="title">¿Qué pasa?</div> <lift:Update.show form="POST"> <label for="update">What's going on? </label> <qp:update/> <qp:submit/> <qp:messages/> </lift:Update.show> </lift:surround> |
這裡沒有表單,而是使用一個 Lift 片段。lift:Update.show 告訴 Lift 我們希望調用 Update 類上的 show 方法。qp:update 標記輸出這個方法中綁定的變數。
package org.developerworks.lift.snippet import scala.xml.NodeSeq import net.liftweb.http.S._ import net.liftweb.http.SHtml._ import net.liftweb.http.RequestVar import net.liftweb.util.Helpers._ import net.liftweb.util.Full class Update { object qpx extends RequestVar(Full("")) // default is empty string def show(xhtml: NodeSeq): NodeSeq = { val temp = if (qpx.isEmpty || qpx.open_!.length == 0) "" else "Received: " + qpx.open_! bind("qp", xhtml, "update" --> text("", v => qpx(Full(v))) % ("size" -> "10") % ("id" -> "update"), "submit" --> submit(?("Update"), ignore => {}), "messages" --> <div>{temp}</div> ) } } |
qpx 對象是一個請求變數。show 方法綁定到表單中提交的值。我們創建一個 temp 變數,它要麼是空字元串,要麼是提交的值加上 Received: 字元串前綴(如果表單提交了值)。bind 部分把數據綁定到視圖中的每個標記。這裡的數據是 XML。text 和 submit 函數是 XML 構建器。對於 messages 標記,我們直接使用 XML。XML 是 Scala 中的第一類成員,Lift 可以直接使用 XML。
為了測試新代碼,只需進行重新編譯,同樣使用 Maven。
$ mvn compile [INFO] Scanning for projects... [INFO] ------------------------------------------------------------------------ [INFO] Building quepasa [INFO] task-segment: [compile] [INFO] ------------------------------------------------------------------------ [INFO] [resources:resources] [INFO] Using default encoding to copy filtered resources. [INFO] [yuicompressor:compress {execution: default}] [INFO] nb warnings: 0, nb errors: 0 [INFO] [compiler:compile] [INFO] Nothing to compile - all classes are up to date [INFO] [scala:compile {execution: default}] [INFO] Compiling 1 source files to /Users/michael/code/lift/quepasa/target/classes [INFO] ------------------------------------------------------------------------ [INFO] BUILD SUCCESSFUL [INFO] ------------------------------------------------------------------------ [INFO] Total time: 7 seconds [INFO] Finished at: Fri May 23 22:21:19 PDT 2008 [INFO] Final Memory: 9M/18M [INFO] ------------------------------------------------------------------------ |
因為我們添加了一個新的 Scala 類,所以必須重新編譯。如果只修改了 HTML 視圖,就不需要重新編譯。不需要停止並重新啟動伺服器;可以在伺服器運行的同時重新編譯應用程序。現在,應用程序應該像圖 4 這樣。
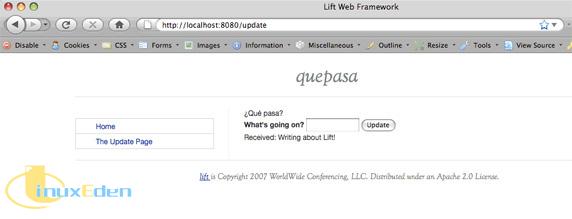
看一下這個頁面的 HTML 源代碼。會看到與清單 9 相似的代碼,但是不完全一樣。
<div id="title" class="heading">¿Qué pasa?</div> <form method="POST" action="/update"> <label for="update">What's going on? </label> <input size="20" name="F1211607483014814000_QS4" type="text" value="" id="update" /> <input name="F1211607483015168000_TRV" type="submit" value="Update" /> <div>Received: Writing about Lift!</div> </form> |
注意,表單欄位的名稱很古怪。這是為了提高表單的安全性,因為這樣就更難偽造表單提交。Lift 會替您處理這些問題。現在已經有了一個安全的表單,下面用這個表單提交的數據做一些比較有意思的事情。為此,需要在應用程序中添加一個模型。
添加模型
再看一下圖 1,您會注意到 model 目錄。這是放置模型類的地方,其中已經有一個模型類:User。這是用於 Web 用戶的通用對象模型,可以按原樣使用、修改或不使用這個模型。這個模型演示了 Lift 的 OR 映射中的許多概念。我們將創建一個新模型來存儲更新。
package org.developerworks.lift.model import net.liftweb.mapper._ import net.liftweb.util._ object Message extends Message with KeyedMetaMapper[Long, Message] { override def dbTableName = "message" override def fieldOrder = id :: text :: Nil } class Message extends KeyedMapper[Long, Message] { def getSingleton = Message // what's the "meta" object def primaryKeyField = id object id extends MappedLongIndex(this) object text extends MappedString(this, 1400) } |
注意,這裡有一個 Message 類和一個 Message 對象。在 Scala 中直接聲明為對象的任何東西都是一個單實例對象(singleton)。單實例對象 Message 作為 Message 類的元存儲庫和工廠類。注意,它擴展 KeyedMetaMapper 對象。在 Scala 中,方括弧表示參數化的類;在這裡,參數是 ID 的類型和實際模型類的類型。這種強大的構造使 Message 對象很容易使用。
Message 類只定義兩個欄位:id 和 text。這些欄位映射到資料庫。類型(比如 MappedString)不但向 Lift 說明欄位如何映射到資料庫類型,還指定欄位的 HTML 顯示方式。現在,可以在片段中使用 Message 模型了。
package org.developerworks.lift.snippet import scala.xml.NodeSeq import net.liftweb.http.S._ import net.liftweb.http.SHtml._ import net.liftweb.http.RequestVar import net.liftweb.util.Helpers._ import net.liftweb.util.Full import org.developerworks.lift.model.Message class Update { object qpx extends RequestVar(Full("")) // default is empty string def show(xhtml: NodeSeq): NodeSeq = { val msgSent = !(qpx.isEmpty || qpx.open_!.length == 0) if (msgSent){ val msg:Message = Message.create msg.text(qpx.open_!).save } val messages = Message.findAll val temp = messages.foldLeft(""){(str, msg) => str + " ### " + msg.text} bind("qp", xhtml, "update" --> text("", v => qpx(Full(v))) % ("size" -> "10") % ("id" -> "update"), "submit" --> submit(?("Update"), ignore => {}), "messages" --> <div>{temp}</div> ) } } |
這裡添加了兩個特性。首先,如果提交了新消息,就創建一個新的 Message 模型並把它保存到資料庫中。接下來,從資料庫裝載所有 Message。我們使用 foldLeft 構造循環遍歷 Message 集合(假設它是從左到右出現的);在每次迭代中,把當前表達式(最初是空字元串,傳遞給 foldLeft 的第一個參數)替換為閉包(傳遞給 foldLeft 的第二個參數)的計算結果。在這裡,實際效果是把所有消息的文本連接在一起,消息之間以 ### 字元串分隔。不一定非以這種方式進行消息格式化,但是它演示了如何使用 Lift 的 OR 框架以及 Scala 的強大功能。
在重新編譯應用程序之前,還需要做一件事情。在 Boot 類中,需要告訴應用程序資料庫有一個新模型。這會在資料庫中創建一個表。這隻需要一行代碼。
Schemifier.schemify(true, Log.infoF _, Message) |
在清單 3 所示的 Boot 類中,可以看到用來建立資料庫連接的邏輯。Lift 可以通過 “約定優先於配置” 方式使用 JNDI 提供的連接:它會自動尋找與 JNDI 名稱綁定的數據源。如果沒有 JNDI 數據源,它會使用 DBVendor 對象管理連接。如果希望使用嵌入的 Derby 資料庫之外的其他資料庫,可以在這裡添加連接信息。
我們已經了解了 Lift 的基本功能,下面看看如何把 Lift 應用程序部署到 Geronimo。
|
部署到 Geronimo
Scala 語法的表達能力比 Java 強得多。儘管如此,Scala 會編譯為與 Java 非常相似的位元組碼。實際上,很難區分 Scala 的位元組碼和從 Java 源代碼生成的位元組碼,其性能也與 Java 相當。Lift 依賴於 Scala,因此編程模型與典型的 Java Web 應用程序框架很不一樣。但是,Lift 仍然作為 Java Web 應用程序運行。在使用嵌入的 Jetty 時,就會以 Java Web 應用程序的形式運行 Lift 應用程序。還可以非常輕鬆地用 Lift 創建 Java WAR,然後把 WAR 部署到任何 Web 容器中,包括 Geronimo。
創建 WAR
在創建 WAR 之前,需要設置 Geronimo。在 webapp/WEB-INF 目錄中,創建一個 Geronimo 部署計劃。
<?xml version="1.0" encoding="UTF-8"?> <web-app xmlns="http://geronimo.apache.org/xml/ns/j2ee/web-1.1"> <environment xmlns="http://geronimo.apache.org/xml/ns/deployment-1.1"> <moduleId> <groupId>liftApps</groupId> <artifactId>quepasa</artifactId> <version>0.1</version> <type>war</type> </moduleId> </environment> <context-root>/quepasa</context-root> </web-app> |
請注意 /quepasa 路徑;在把應用程序部署到 Geronimo 之後,將用這個路徑訪問應用程序。現在,可以使用 Maven 創建 WAR 文件。
$ mvn package [INFO] Scanning for projects... [INFO] ------------------------------------------------------------------------ [INFO] Building quepasa [INFO] task-segment: [package] [INFO] ------------------------------------------------------------------------ [INFO] [resources:resources] [INFO] Using default encoding to copy filtered resources. [INFO] [yuicompressor:compress {execution: default}] [INFO] nb warnings: 0, nb errors: 0 [INFO] [compiler:compile] [INFO] Nothing to compile - all classes are up to date [INFO] [scala:compile {execution: default}] [INFO] Nothing to compile - all classes are up to date [INFO] [resources:testResources] [INFO] Using default encoding to copy filtered resources. [INFO] [compiler:testCompile] [INFO] Nothing to compile - all classes are up to date [INFO] [scala:testCompile {execution: default}] [INFO] Nothing to compile - all classes are up to date [INFO] Surefire report directory: /Users/michael/code/lift/ quepasa/target/surefire-reports ------------------------------------------------------- T E S T S ------------------------------------------------------- Running org.developerworks.lift.AppTest Tests run: 1, Failures: 0, Errors: 0, Skipped: 0, Time elapsed: 0.039 sec Results : Tests run: 1, Failures: 0, Errors: 0, Skipped: 0 [INFO] [war:war] [INFO] Packaging webapp [INFO] Assembling webapp[quepasa] in [/Users/michael/code/lift/ quepasa/target/quepasa-0.1] [INFO] Processing war project [INFO] Webapp assembled in[811 msecs] [INFO] Building war: /Users/michael/code/lift/quepasa/target/quepasa-0.1.war [INFO] ------------------------------------------------------------------------ [INFO] BUILD SUCCESSFUL [INFO] ------------------------------------------------------------------------ [INFO] Total time: 31 seconds [INFO] Finished at: Sun May 25 23:02:08 PDT 2008 [INFO] Final Memory: 13M/23M [INFO] ------------------------------------------------------------------------ |
在第一次運行這個命令時,會下載幾個 JAR。既然已經創建了 WAR,就可以把它部署到 Geronimo 了。
部署 WAR
把應用程序部署到 Geronimo 很容易,對於 Lift Web 應用程序也是如此。可以使用 Geronimo 控制台,見圖 5。
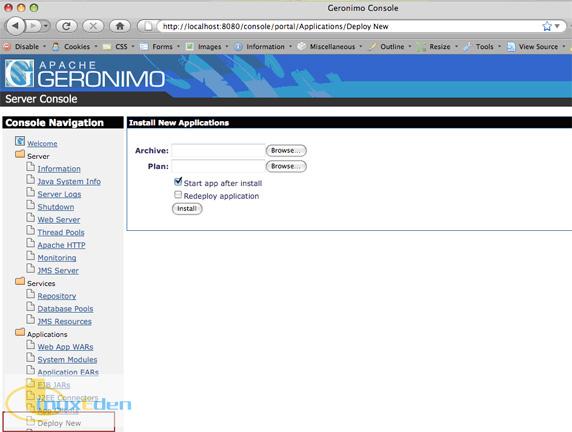
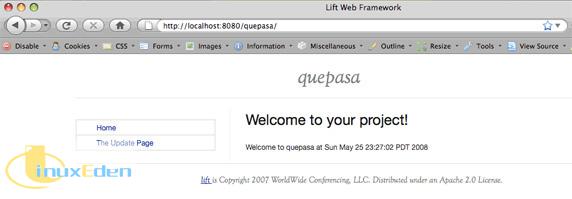
使用 Archive > Browse 按鈕導航到 Maven 在清單 14 中創建的 WAR 文件並安裝這個應用程序。安裝之後,可以訪問 http://locahost:8080/quepasa,如下所示。
這個應用程序的表現與測試期間完全一樣。以這個應用程序為基礎,可以進一步進行定製,以添加更多的頁面和模型等等。可以通過修改主模板來定製它的外觀。還可以創建供 Lift 使用的資料庫池綁定,從而使與 Geronimo 的集成更緊密。
|
結束語
本文演示了如何設置和運行 Lift。我們看到了 Lift 的所有基本組成部分:引導類、視圖、片段和模型。還看到如何按照以視圖為中心的方式把這些組件組合成 Web 應用程序。我們看到了把 Lift 應用程序部署到 Geronimo 是多麼容易,這使我們能夠享受 Geronimo 提供的眾多好處。我們還可以實現許多特性,而且 Lift 仍然非常年輕,有很大的發展餘地。請隨時關注 Lift 的發展並使用它滿足您的需要。(責任編輯:A6)
[火星人 ] 結合使用 Apache Geronimo 和 Lift已經有590次圍觀
