之前對於使用域名如何訪問項目很好奇,但苦於搞一個自己的域名實在是太麻煩了,還需要去買,各種提交資料,等待審核,備案。。。現在手上沒什麼項目,也什麼事情,想著折騰折騰。。。
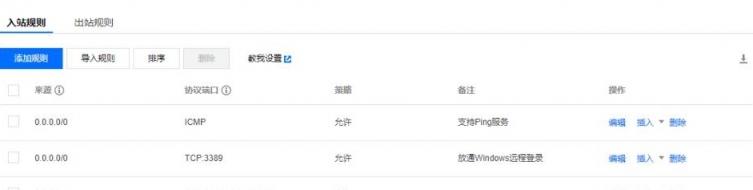
看著騰訊服務器打折,花了40塊錢大洋買了一個最低版本的服務器(窮,沒辦法,反正個人用用夠了),這裡不得不吐槽一下騰訊,安全級別設那麼高幹嘛,直接遠程登錄不行,因為ip都ping不通,還有各種端口、命令全部禁掉,因為之前用過阿里雲,安全級別沒這麼高,折騰了大半天,配置如下
然後開始正式操作,先隨便搭個項目,能訪問就行,通過tomcat啟動,輸入http://localhost:8080/demo/login/index.do進入頁面,接下來需要把localhost換成我之前買的域名,之前沒搞過,直接問度娘,查到說是tomcat中的server.xml配置需要更改,把裡面的localhost改為自己的域名,端口號改為商用端口號80,但很可惜,沒成功,啟動後訪問不到頁面(這裡可能有我配置的原因,還有其他我沒注意瞭解到的配置,看到文章的大神可以給與我指導),換用其他的方法,度娘上查到,域名是需要進行解析的,配置如下
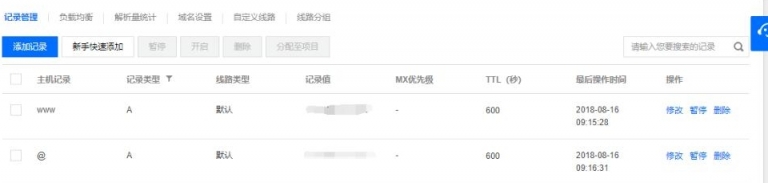
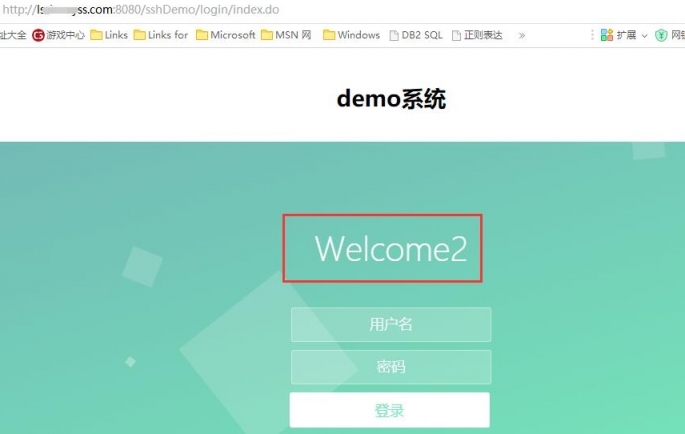
記錄值為使用服務器的域名,啟動系統,訪問http://www.XXX.com:8080/demo/login/index.do頁面訪問成功,算上小小的搞定了。
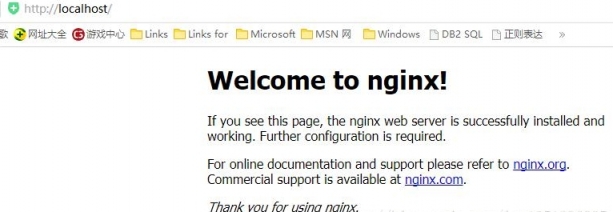
之後我們需要使用nginx+tomcat的方式訪問,簡單的體驗一下負載均衡,下了一個windows版的nginx,直接點擊nginx.exe,一閃而過,訪問http://localhost進入頁面
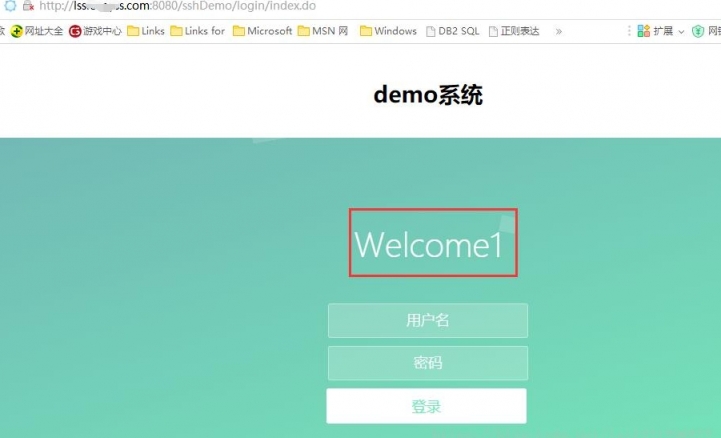
之後啟動兩個tomcat,端口分別是8081和8082,nginx端口為8080,之後配置nginx.conf文件
#user nobody; worker_processes 1; #error_log logs/error.log; #error_log logs/error.log notice; #error_log logs/error.log info; #pid logs/nginx.pid; events { worker_connections 1024; } http { include mime.types; default_type application/octet-stream; #log_format main '$remote_addr - $remote_user [$time_local] "$request" ' # '$status $body_bytes_sent "$http_referer" ' # '"$http_user_agent" "$http_x_forwarded_for"'; #access_log logs/access.log main; sendfile on; #tcp_nopush on; #keepalive_timeout 0; keepalive_timeout 65; #gzip on; upstream lssxxxyss.com{ server 139.199.127.123:8081 weight=1; #weight為權重,可以看做是訪問次數的比重 server 139.199.127.123:8082 weight=2; } server { listen 8080; server_name lssxxxyss.com www.lssxxxyss.com; #charset koi8-r; #access_log logs/host.access.log main; location / { #root html; #index index.html index.htm; proxy_pass http://lssxxxyss.com; } #error_page 404 /404.html; 。。。以下忽略。。。 }接下來訪問頁面,輸入地址http://lssxxxyss.com:8080/sshDemo/login/index.do,多次訪問後顯示出不同的頁面(為了區分兩個tomcat中項目的登錄頁面,體現出確實是負載均衡了一下)
finish!!!
補充知識: Nginx配置java項目在Tomcat下訪問
原理是使用nginx的反向代理
Nginx 安裝路徑一般為: /usr/local/nginx
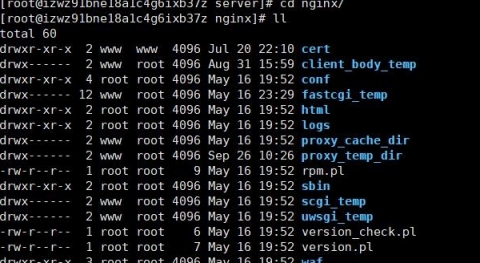
在這裡插入代碼片 > |-- client_body_temp |-- conf #這是Nginx所有配置文件的目錄,極其重要 | |-- fastcgi.conf #fastcgi相關參數的配置文件 | |-- fastcgi.conf.default #fastcgi.conf的原始備份 | |-- fastcgi_params #fastcgi的參數文件 | |-- fastcgi_params.default | |-- koi-utf | |-- koi-win | |-- mime.types #媒體類型, | |-- mime.types.default | |-- nginx.conf #這是Nginx默認的主配置文件 | |-- nginx.conf.default | |-- scgi_params #scgi相關參數文件,一般用不到 | |-- scgi_params.default | |-- uwsgi_params #uwsgi相關參數文件,一般用不到 | |-- uwsgi_params.default | `-- win-utf |-- fastcgi_temp #fastcgi臨時數據目錄 |-- html #這是編譯安裝時Nginx的默認站點目錄,類似 Apache的默認站點htdocs目錄 | |--50x.html # 錯誤頁面優雅替代顯示文件,例如:出現502錯誤時會調用此頁面 # error_page 500502503504 /50x.html; | `-- index.html # 默認的首頁文件,首頁文件名字是在nginx.conf中事先定義好的。 |-- logs #這是Nginx默認的日誌路徑,包括錯誤日誌及訪問日誌 | |-- access.log # 這是Nginx的默認訪問日誌文件,使用tail -f access.log,可以實時觀看網站用戶訪問情況信息 | |-- error.log # 這是Nginx的錯誤日誌文件,如果Nginx出現啟動故障等問題,一定要看看這個錯誤日誌 | `-- nginx.pid # Nginx的pid文件,Nginx進程啟動後,會把所有進程的ID號寫到此文件 |-- proxy_temp #臨時目錄 |-- sbin #這是Nginx命令的目錄,如Nginx的啟動命令nginx | `-- nginx #Nginx的啟動命令nginx |-- scgi_temp #臨時目錄 `-- uwsgi_temp #臨時目錄 9 directories,21 files
在其/usr/local/nginx目錄下創建vhost目錄,然後在vhosts文件夾下創建一個tomcats.conf文件
tomcats.conf文件內容如下:
例如:這個有兩個java 項目需要用到Tomcat訪問,配置如下
server { listen 80; server_name ce1.xdr630.top;#訪問tomcat服務的域名 #charset koi8-r; #access_log logs/host.access.log main; location / { proxy_pass http://127.0.0.1:8081;#tomcat服務的地址 root html; index index.html index.htm; } error_page 500 502 503 504 /50x.html; location = /50x.html { root html; } } server { listen 80; server_name ce2.xdr630.top;#訪問tomcat服務的域名 #charset koi8-r; #access_log logs/host.access.log main; location / { proxy_pass http://127.0.0.1:8082;#tomcat服務的地址 root html; index index.html index.htm; } error_page 500 502 503 504 /50x.html; location = /50x.html { root html; } }打開nginx安裝目錄下的conf下的nginx.conf文件 (我的目錄是 /usr/local/nginx/conf/nginx.conf)
在文件底部加上
include /usr/local/nginx/vhosts/*; (包含所有虛擬機主機文件)
然後在文件中間找到
location / { proxy_pass http://192.168.0.148:8080; (加上這個,指定自己本機的tomcat的地址) root html; index index.html index.htm; }重啟tomcat,nginx。其實Nginx一般是不用重啟的,它可以通過與-s參數調用可執行來控制
重載配置文件:
/usr/local/nginx/sbin/nginx -t //先檢查語法是否有誤
/usr/local/nginx/sbin/nginx -s reload //再重載配置
查看Nginx啟動情況:
ps -a | grep nginx
也可以重啟nginx服務 lnmp restart 即可直接通過域名訪問到tomcat服務
補充:
啟動Nginx查看幫助:./nginx -h
啟動Nginx:cd sbin ; ./nginx
[sl_ivan ] nginx+tomcat 通過域名訪問項目的實例已經有397次圍觀
