最近在做項目的過程中 需要用JWT做登錄和鑑權 查了很多資料 都不甚詳細
有的是需要在application.yml裡進行jwt的配置 但我在導包後並沒有相應的配置項 因而並不適用
在踩過很多坑之後 稍微整理了一下 做個筆記
一、概念
1、什麼是JWT
Json Web Token (JWT)是為了在網絡應用環境間傳遞聲明而執行的一種基於JSON的開放標準(RFC 7519)
該token被設計為緊湊且安全的 特別適用於分佈式站點的單點登錄(SSO)場景
隨著JWT的出現 使得校驗方式更加簡單便捷化
JWT實際上就是一個字符串 它由三部分組成:頭部 載荷和簽名
用[.]分隔這三個部分 最終的格式類似於:xxxx.xxxx.xxxx
在服務器直接根據token取出保存的用戶信息 即可對token的可用性進行校驗 使得單點登錄更為簡單
2、JWT校驗的過程
1、瀏覽器發送用戶名和密碼 發起登錄請求
2、服務端驗證身份 根據算法將用戶標識符打包生成token字符串 並且返回給瀏覽器
3、當瀏覽器需要發起請求時 將token一起發送給服務器
4、服務器發現數據中攜帶有token 隨即進行解密和鑑權
5、校驗成功 服務器返回請求的數據
二、使用
1、首先是導包
org.springframework.boot spring-boot-starter-security org.springframework.security spring-security-jwt 1.0.10.RELEASE io.jsonwebtoken jjwt 0.9.1 org.apache.commons commons-lang3 3.4
2、實體類
兩個實體類 一個是用戶 另一個是權限
public class User { private Integer id; private String username; private String password; 省略gettersetter之類的代碼... }
public class Role { private Integer id; private String username; private String name; 省略gettersetter之類的代碼... }
3、然後需要一個Utils工具類
該類用於進行Token的加密和解密 可在此類中單元測試
import io.jsonwebtoken.Claims; import io.jsonwebtoken.Jwts; import io.jsonwebtoken.SignatureAlgorithm; import java.util.Date; import java.util.HashMap; import java.util.Map; public class JwtTokenUtil { // Token請求頭 public static final String TOKEN_HEADER = "Authorization"; // Token前綴 public static final String TOKEN_PREFIX = "Bearer "; // 簽名主題 public static final String SUBJECT = "piconjo"; // 過期時間 public static final long EXPIRITION = 1000 * 24 * 60 * 60 * 7; // 應用密鑰 public static final String APPSECRET_KEY = "piconjo_secret"; // 角色權限聲明 private static final String ROLE_CLAIMS = "role"; /** * 生成Token */ public static String createToken(String username,String role) { Mapmap = new HashMap<>(); map.put(ROLE_CLAIMS, role); String token = Jwts .builder() .setSubject(username) .setClaims(map) .claim("username",username) .setIssuedAt(new Date()) .setExpiration(new Date(System.currentTimeMillis() + EXPIRITION)) .signWith(SignatureAlgorithm.HS256, APPSECRET_KEY).compact(); return token; } /** * 校驗Token */ public static Claims checkJWT(String token) { try { final Claims claims = Jwts.parser().setSigningKey(APPSECRET_KEY).parseClaimsJws(token).getBody(); return claims; } catch (Exception e) { e.printStackTrace(); return null; } } /** * 從Token中獲取username */ public static String getUsername(String token){ Claims claims = Jwts.parser().setSigningKey(APPSECRET_KEY).parseClaimsJws(token).getBody(); return claims.get("username").toString(); } /** * 從Token中獲取用戶角色 */ public static String getUserRole(String token){ Claims claims = Jwts.parser().setSigningKey(APPSECRET_KEY).parseClaimsJws(token).getBody(); return claims.get("role").toString(); } /** * 校驗Token是否過期 */ public static boolean isExpiration(String token){ Claims claims = Jwts.parser().setSigningKey(APPSECRET_KEY).parseClaimsJws(token).getBody(); return claims.getExpiration().before(new Date()); } }
4、配置UserDetailsService的實現類 用於加載用戶信息
import xxx.xxx.xxx.bean.Role; // 自己的包 import xxx.xxx.xxx.bean.User; // 自己的包 import xxx.xxx.xxx.mapper.UserMapper; // 自己的包 import org.springframework.beans.factory.annotation.Autowired; import org.springframework.security.core.authority.SimpleGrantedAuthority; import org.springframework.security.core.userdetails.UserDetails; import org.springframework.security.core.userdetails.UserDetailsService; import org.springframework.security.core.userdetails.UsernameNotFoundException; import org.springframework.stereotype.Service; import java.util.ArrayList; import java.util.List; @Service public class UserDetailsServiceImpl implements UserDetailsService { @Autowired private UserMapper userMapper; @Override public UserDetails loadUserByUsername(String s) throws UsernameNotFoundException { if (s == null || "".equals(s)) { throw new RuntimeException("用戶不能為空"); } // 調用方法查詢用戶 User user = userMapper.findUserByUsername(s); if (user == null) { throw new RuntimeException("用戶不存在"); } Listauthorities = new ArrayList<>(); for (Role role:userMapper.findRoleByUsername(s)) { authorities.add(new SimpleGrantedAuthority("ROLE_"+role.getName())); } return new org.springframework.security.core.userdetails.User(user.getUsername(),"{noop}"+user.getPassword(),authorities); } }
5、然後 配置兩個攔截器
其中 一個用於登錄 另一個用於鑑權
JWTAuthenticationFilter登錄攔截器:
該攔截器用於獲取用戶登錄的信息
至於具體的驗證 只需創建一個token並調用authenticationManager的authenticate()方法
讓Spring security驗證即可 驗證的事交給框架
import com.alibaba.fastjson.JSON; import xxx.xxx.xxx.utils.JwtTokenUtil; // 自己的包 import org.springframework.security.authentication.*; import org.springframework.security.core.Authentication; import org.springframework.security.core.AuthenticationException; import org.springframework.security.core.GrantedAuthority; import org.springframework.security.core.userdetails.User; import org.springframework.security.web.authentication.UsernamePasswordAuthenticationFilter; import javax.servlet.FilterChain; import javax.servlet.ServletException; import javax.servlet.http.HttpServletRequest; import javax.servlet.http.HttpServletResponse; import java.io.IOException; import java.util.Collection; /** * 驗證用戶名密碼正確後 生成一個token並將token返回給客戶端 */ public class JWTAuthenticationFilter extends UsernamePasswordAuthenticationFilter { private AuthenticationManager authenticationManager; public JWTAuthenticationFilter(AuthenticationManager authenticationManager) { this.authenticationManager = authenticationManager; } /** * 驗證操作 接收並解析用戶憑證 */ @Override public Authentication attemptAuthentication(HttpServletRequest request,HttpServletResponse response) throws AuthenticationException { // 從輸入流中獲取到登錄的信息 // 創建一個token並調用authenticationManager.authenticate() 讓Spring security進行驗證 return authenticationManager.authenticate(new UsernamePasswordAuthenticationToken(request.getParameter("username"),request.getParameter("password"))); } /** * 驗證【成功】後調用的方法 * 若驗證成功 生成token並返回 */ @Override protected void successfulAuthentication(HttpServletRequest request,HttpServletResponse response,FilterChain chain,Authentication authResult) throws IOException { User user= (User) authResult.getPrincipal(); // 從User中獲取權限信息 Collection authorities = user.getAuthorities(); // 創建Token String token = JwtTokenUtil.createToken(user.getUsername(), authorities.toString()); // 設置編碼 防止亂碼問題 response.setCharacterEncoding("UTF-8"); response.setContentType("application/json; charset=utf-8"); // 在請求頭裡返回創建成功的token // 設置請求頭為帶有"Bearer "前綴的token字符串 response.setHeader("token", JwtTokenUtil.TOKEN_PREFIX + token); // 處理編碼方式 防止中文亂碼 response.setContentType("text/json;charset=utf-8"); // 將反饋塞到HttpServletResponse中返回給前臺 response.getWriter().write(JSON.toJSONString("登錄成功")); } /** * 驗證【失敗】調用的方法 */ @Override protected void unsuccessfulAuthentication(HttpServletRequest request, HttpServletResponse response, AuthenticationException failed) throws IOException, ServletException { String returnData=""; // 賬號過期 if (failed instanceof AccountExpiredException) { returnData="賬號過期"; } // 密碼錯誤 else if (failed instanceof BadCredentialsException) { returnData="密碼錯誤"; } // 密碼過期 else if (failed instanceof CredentialsExpiredException) { returnData="密碼過期"; } // 賬號不可用 else if (failed instanceof DisabledException) { returnData="賬號不可用"; } //賬號鎖定 else if (failed instanceof LockedException) { returnData="賬號鎖定"; } // 用戶不存在 else if (failed instanceof InternalAuthenticationServiceException) { returnData="用戶不存在"; } // 其他錯誤 else{ returnData="未知異常"; } // 處理編碼方式 防止中文亂碼 response.setContentType("text/json;charset=utf-8"); // 將反饋塞到HttpServletResponse中返回給前臺 response.getWriter().write(JSON.toJSONString(returnData)); } }
JWTAuthorizationFilter權限校驗攔截器:
當訪問需要權限校驗的URL(當然 該URL也是需要經過配置的) 則會來到此攔截器 在該攔截器中對傳來的Token進行校驗
只需告訴Spring security該用戶是否已登錄 並且是什麼角色 擁有什麼權限即可
import xxx.xxx.xxx.utils.JwtTokenUtil; // 自己的包 import org.apache.commons.lang3.StringUtils; import org.springframework.security.authentication.AuthenticationManager; import org.springframework.security.authentication.UsernamePasswordAuthenticationToken; import org.springframework.security.core.authority.SimpleGrantedAuthority; import org.springframework.security.core.context.SecurityContextHolder; import org.springframework.security.web.authentication.www.BasicAuthenticationFilter; import javax.servlet.FilterChain; import javax.servlet.ServletException; import javax.servlet.http.HttpServletRequest; import javax.servlet.http.HttpServletResponse; import java.io.IOException; import java.util.ArrayList; import java.util.Collection; /** * 登錄成功後 走此類進行鑑權操作 */ public class JWTAuthorizationFilter extends BasicAuthenticationFilter { public JWTAuthorizationFilter(AuthenticationManager authenticationManager) { super(authenticationManager); } /** * 在過濾之前和之後執行的事件 */ @Override protected void doFilterInternal(HttpServletRequest request,HttpServletResponse response,FilterChain chain) throws IOException, ServletException { String tokenHeader = request.getHeader(JwtTokenUtil.TOKEN_HEADER); // 若請求頭中沒有Authorization信息 或是Authorization不以Bearer開頭 則直接放行 if (tokenHeader == null || !tokenHeader.startsWith(JwtTokenUtil.TOKEN_PREFIX)) { chain.doFilter(request, response); return; } // 若請求頭中有token 則調用下面的方法進行解析 並設置認證信息 SecurityContextHolder.getContext().setAuthentication(getAuthentication(tokenHeader)); super.doFilterInternal(request, response, chain); } /** * 從token中獲取用戶信息並新建一個token * * @param tokenHeader 字符串形式的Token請求頭 * @return 帶用戶名和密碼以及權限的Authentication */ private UsernamePasswordAuthenticationToken getAuthentication(String tokenHeader) { // 去掉前綴 獲取Token字符串 String token = tokenHeader.replace(JwtTokenUtil.TOKEN_PREFIX, ""); // 從Token中解密獲取用戶名 String username = JwtTokenUtil.getUsername(token); // 從Token中解密獲取用戶角色 String role = JwtTokenUtil.getUserRole(token); // 將[ROLE_XXX,ROLE_YYY]格式的角色字符串轉換為數組 String[] roles = StringUtils.strip(role, "[]").split(", "); Collectionauthorities=new ArrayList<>(); for (String s:roles) { authorities.add(new SimpleGrantedAuthority(s)); } if (username != null) { return new UsernamePasswordAuthenticationToken(username, null,authorities); } return null; } }
6、再配置一個自定義類 用於進行匿名用戶訪問資源時無權限的處理
該類需實現AuthenticationEntryPoint
import com.alibaba.fastjson.JSONObject; import org.springframework.security.core.AuthenticationException; import org.springframework.security.web.AuthenticationEntryPoint; import javax.servlet.ServletException; import javax.servlet.http.HttpServletRequest; import javax.servlet.http.HttpServletResponse; import java.io.IOException; public class JWTAuthenticationEntryPoint implements AuthenticationEntryPoint { @Override public void commence(HttpServletRequest request, HttpServletResponse response, AuthenticationException authException) throws IOException, ServletException { response.setCharacterEncoding("utf-8"); response.setContentType("text/javascript;charset=utf-8"); response.getWriter().print(JSONObject.toJSONString("您未登錄,沒有訪問權限")); } }
7、最後 將這些組件組裝到一起即可
創建一個自定義的配置類 繼承WebSecurityConfigurerAdapter
在該類上 需加@EnableWebSecurity註解 配置Web安全過濾器和啟用全局認證機制
import xxx.xxx.xxx.JWTAuthenticationEntryPoint; // 自己的包 import xxx.xxx.xxx.xxx.JWTAuthenticationFilter; // 自己的包 import xxx.xxx.xxx.xxx.JWTAuthorizationFilter; // 自己的包 import org.springframework.beans.factory.annotation.Autowired; import org.springframework.beans.factory.annotation.Qualifier; import org.springframework.context.annotation.Bean; import org.springframework.security.config.annotation.authentication.builders.AuthenticationManagerBuilder; import org.springframework.security.config.annotation.web.builders.HttpSecurity; import org.springframework.security.config.annotation.web.configuration.EnableWebSecurity; import org.springframework.security.config.annotation.web.configuration.WebSecurityConfigurerAdapter; import org.springframework.security.config.http.SessionCreationPolicy; import org.springframework.security.core.userdetails.UserDetailsService; import org.springframework.web.cors.CorsConfiguration; import org.springframework.web.cors.CorsConfigurationSource; import org.springframework.web.cors.UrlBasedCorsConfigurationSource; @EnableWebSecurity public class SecurityConfig extends WebSecurityConfigurerAdapter { @Autowired @Qualifier("userDetailsServiceImpl") private UserDetailsService userDetailsService; @Override protected void configure(AuthenticationManagerBuilder auth) throws Exception { auth.userDetailsService(userDetailsService); } /** * 安全配置 */ @Override protected void configure(HttpSecurity http) throws Exception { // 跨域共享 http.cors() .and() // 跨域偽造請求限制無效 .csrf().disable() .authorizeRequests() // 訪問/data需要ADMIN角色 .antMatchers("/data").hasRole("ADMIN") // 其餘資源任何人都可訪問 .anyRequest().permitAll() .and() // 添加JWT登錄攔截器 .addFilter(new JWTAuthenticationFilter(authenticationManager())) // 添加JWT鑑權攔截器 .addFilter(new JWTAuthorizationFilter(authenticationManager())) .sessionManagement() // 設置Session的創建策略為:Spring Security永不創建HttpSession 不使用HttpSession來獲取SecurityContext .sessionCreationPolicy(SessionCreationPolicy.STATELESS) .and() // 異常處理 .exceptionHandling() // 匿名用戶訪問無權限資源時的異常 .authenticationEntryPoint(new JWTAuthenticationEntryPoint()); } /** * 跨域配置 * @return 基於URL的跨域配置信息 */ @Bean CorsConfigurationSource corsConfigurationSource() { final UrlBasedCorsConfigurationSource source = new UrlBasedCorsConfigurationSource(); // 註冊跨域配置 source.registerCorsConfiguration("/**", new CorsConfiguration().applyPermitDefaultValues()); return source; } }
定義一個用於測試的對外映射接口:
@RestController public class UserController { @GetMapping("/data") private ResponseUtil data() { return "This is data."; } }
默認登錄路徑是/login 用POST請求發送
若要修改默認的登錄路徑 只需要在自己定義的登錄過濾器JWTAuthenticationFilter的構造方法裡進行配置即可
比如 若想修改為/api/login:
public JWTAuthenticationFilter(AuthenticationManager authenticationManager) { this.authenticationManager = authenticationManager; // 設置登錄URL super.setFilterProcessesUrl("/api/login"); }
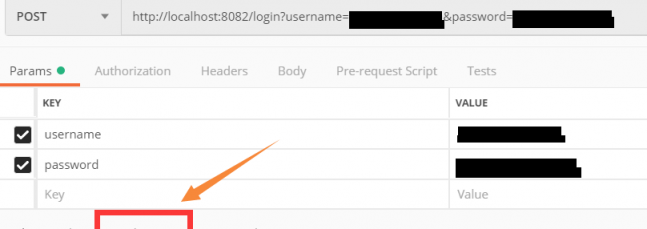
登錄時 參數的屬性名分別是username和password 不能改動:
登錄成功後會返回一個Token:

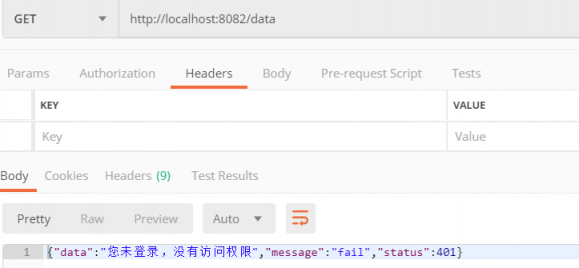
在請求需要權限的接口路徑時 若不帶上Token 則會提示沒有訪問權限
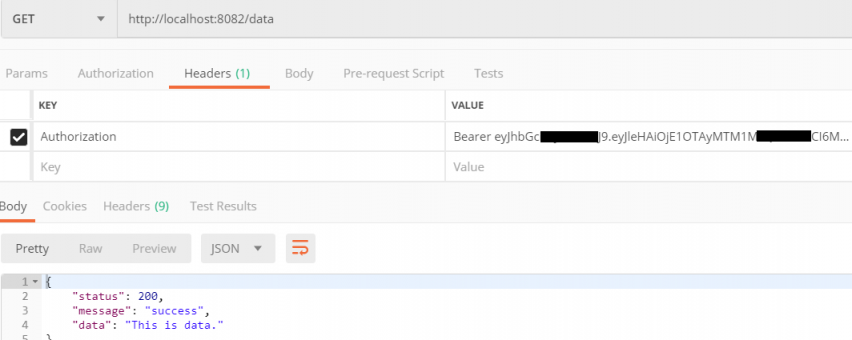
帶上Token後再次請求 即可正常訪問:
注:Token的前面要帶有Bearer 的前綴
這樣 一個基本的實現就差不多完成了
為簡單演示 在該案例中就不對密碼進行加密了 實際開發是需要對明文密碼加密後存儲的 推薦用BCrypt進行加密和解密
為節省篇幅 用於註冊的接口也不寫了 實際上在註冊接口傳入的密碼也需要用BCrypt加密後再存入數據庫中
還可以用Redis進行Token的存儲 這些都是後話了
[kyec555 ] SpringBoot集成Spring Security用JWT令牌實現登錄和鑑權的方法已經有240次圍觀
